Sunday 29 November 2009

How to avoid Forgetting Subject when sending emails

Hi,
Sometimes we forget to put the SUBJECT in the mails which we send. That could be deadly sometimes when you are communicating to the clients; to avoid such a situation, follow the steps below. There after when you send a mail without subject, a pop up window asks for your confirmation. You can try it !

Steps:
1. Open your outlook
2. Press Alt+F11. This opens the Visual Basic editor
3. On the Left Pane, one can see "Microsoft Outlook Objects", expand this. Now one can see the "ThisOutLookSession".
4. Click on "ThisOutLookSession".
5. Copy and Paste the following code in the right pane. (Code Pane)

Private Sub Application_ItemSend(ByVal Item As Object, Cancel As Boolean)
Dim strSubject As String
strSubject = Item.Subject
If Len(strSubject) = 0 Then
Prompt$ = "Subject is Empty. Are you sure you want to send the Mail?"
If MsgBox(Prompt$, vbYesNo + vbQuestion + vbMsgBoxSetForeground, "Check for Subject") = vbNo Then
Cancel = True
End If
End If
End Sub

6. Save this and Now close the VB Code editor.
7. In Outlook Go to Tools > Macros > Security > In the Security Level Tab > Select the option MEDIUM > OK
8. Now Restart the Outlook, a dialog box pops up to Disable / Enable the macros; select as Enable Macros (this option will pops up when ever you restart outlook.
9. From now on , this macro will make sure you do not make the mistake of sending a mail without subject

Wednesday 11 November 2009

Mac OS X Snow Leopard versus Windows 7

Managing Your Files

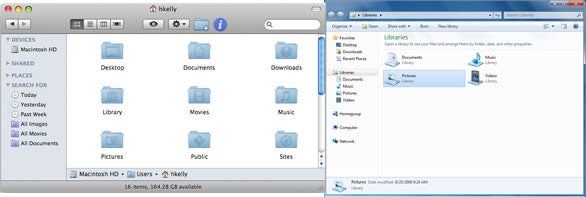
Snow Leopard’s Finder and Windows 7’s Explorer have strikingly similar interfaces: Both have quick search fields in the upper-right corner, path bars (OS X’s is optional and can be switched on in the View menu), and sidebars giving you easy access to various common locations on your computer.
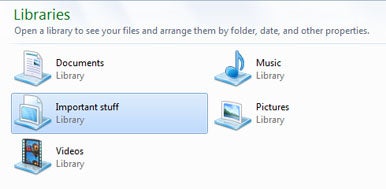
Windows 7 introduces a new feature to the mix: Libraries. A library is best defined as a way to view the contents of several folders all in one place. For example, the Pictures library pulls together the contents of the My Pictures and Public Pictures folders by default. You can add or change the folders tied to any particular library, of course. Nothing in Snow Leopard directly compares with Windows' libraries. The closest OS X feature is saved searches (known as Smart Folders), but a saved search pulls together files based on search criteria, not location. You can’t, for example, create a smart folder containing all photos from only two folders. On the other hand, Windows 7 libraries can’t be combined with saved search results.
Both Snow Leopard and Windows 7 allow a large icon view. Windows 7 supports icons up to 256-by-256 pixels. Snow Leopard one-ups Windows 7, though—the Finder can display icons up to a seemingly absurd 512-by-512 pixels (512-pixel icons were around in 10.5, but the Finder could not take advantage of them outside of Quick Look and Cover Flow view).

Quick Access

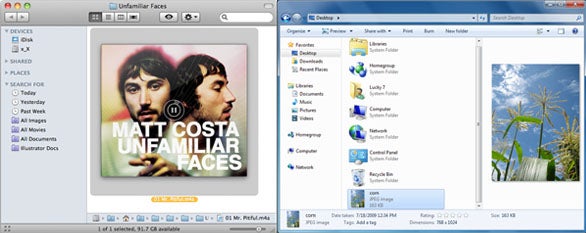
Some OS X apps can use the Dock’s pop-up menus to display application-specific information and provide easy access to frequently used commands. For example, if you right-click iTunes’ Dock icon in Snow Leopard, you’ll get a menu that lets you see what’s playing, play or pause your music, assign a rating to the current song, and control other simple iTunes commands.
With Windows 7’s re-tooled taskbar, Microsoft introduces a similar feature called jump lists. Jump lists can not only provide access to common commands (Windows Media Player‘s jump list has a Play command, for example), they also let you “pin” items to a specific list. For example, you can pin commonly-used folders to the Windows Explorer jump list and important documents to the WordPad jump list. Snow Leopard doesn’t have any features that directly compare to the jump list's pinning feature; instead, Mac users can use stacks in the Dock to provide quick access to folders and files (drag any folder to the Dock to create a stack). Stacks get a refresh in Snow Leopard: You can now view unlimited items in a stack using Grid view (thanks to the addition of scrollbars), as well as drill down into folders without having to open any Finder windows. You can also drag and drop any file into the Dock for quick access.

Previews

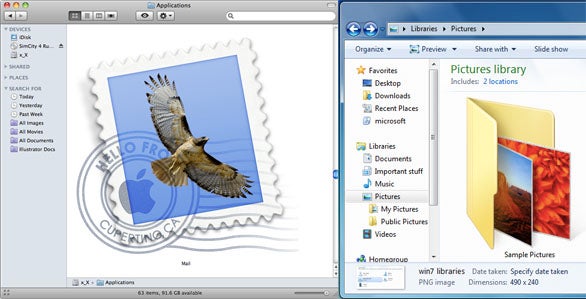
In addition to Leopard's preview features (Quick Look, Cover Flow), Snow Leopard adds inline preview to the Finder’s icon view. When viewing a folder using 64-by-64 pixel icons or larger, mousing over your files will display preview and playback controls. If you mouse over an audio or video file, you’ll get a play button. If you mouse over a Word doc, a PowerPoint presentation, or PDF (among other common file formats), you’ll get forward and back arrows for paging through a document. Windows 7 has an optional preview pane for use in any Explorer window. Select a file, and the preview will appear in the preview pane. Windows 7’s preview feature seems pretty basic compared to Snow Leopard’s (text loses all formatting, for example), but it’s better than nothing. Also, as was the case with Vista, folder icons in Windows 7 give you a peek at the folder's contents.

Window Management

Expose, a part of Mac OS X since 2003, learns some new tricks in Snow Leopard. Most notably, you can now click and hold the Dock icon for any open application to view all open windows for that application. This now includes minimized windows; In previous versions of OS X, Expose ignored any windows you sent to the Dock. In Snow Leopard, these windows are now represented by a thumbnail in Expose.
Also, Snow Leopard now arranges windows in a grid when viewed in Expose. previously windows scaled down in a seemingly haphazard manner. I actually prefer the old method of handling Expose—I find the windows all end up about the same size with the new Expose arrangement, which makes it harder for me to find what I’m looking for, but this is very much a personal preference issue.
Windows 7 brings a new window management tool to the table as well. Called Aero Peek, this new feature makes it easier to see which window you want. To use Aero Peek, click the taskbar icon for the application the window you’re looking for belongs to, then mouse over the thumbnails. All other windows go transparent, leaving only the window you mouse over visible.
The most useful aspect of Aero Peek, though, is the desktop peek feature. If you want to take a quick look at the desktop without actually hiding all your windows, simply shove your mouse into the lower-right corner of the taskbar; all windows will turn transparent. Click this spot once to hide all open windows and see the desktop, and click again to get back to work. This is roughly equivalent to the Show Desktop feature in OS X's Exposé, which moves all windows off the screen with a keystroke (or flick of the mouse, if you have a hot-corner for Exposé set).

The Verdict

Both Windows 7 and Snow Leopard are solid updates to the respective operating systems, but I can't say either one by itself will make someone want to jump ship and cross to the other side. If you're perfectly happy with Windows, Snow Leopard probably won't make you lust for a Mac. Likewise, if you're a Mac user and weren't considering switching to Windows before, Windows 7 isn't likely to change your mind.

Wednesday 25 February 2009

How to use Notepad as a Simple Digital Diary

Do you maintain a diary, it may be personal of any day to day related activities, if you do and is bit online savvy then you can try this cool hidden feature of Notepad. Amazingly Notepad act as a simple digital diary for us.
Here’s the simple steps to use the Windows Notepad as a simple digital diary.
  1. Open the Notepad and type .LOG and press enter.
  2. Save the file with any name of your choice and close it.
  3. Now open the file again in Notepad. Surprisingly the current date and time is inserted automatically after the .LOG line. Now you can write you daily dairy entry here.
Each time you open the file, Notepad repeat the process, appending the time and date to the end of the file and placing the cursor below it.
Cool isn’t. This way one can make Notepad as a simple digital diary. Are you going to try?
Note:- By using F5, we can also bring current date and time but it lacks the automatic insertion of date and time.

Friday 30 January 2009

How to recover the Permanently deleted Outlook lMails

Hi All,
Procedure to recover shift deleted [permanently deleted] mails from Microsoft Outlook.

1) First go to Run and type regedit
2) Go to: \HKEY_LOCAL_MACHINE\SOFTWARE\MICROSOFT\EXCHANGE\CLIENT\OPTIONS registry key.
3) Right click options and add new DWORD VALUE (data type is REG_DWORD) and then right click and rename to DumpsterAlwaysOn. It is case sensitive.
4) Then rights click and modify and make the value 1 to turn the Recover Deleted Items menu choice on for all folders or enter 0 to turn it off.
5) Then go to Outlook , choose "Recover deleted items" option from the Tools Menu to get back your "permanently deleted" mails!

Note : This procedure can recover mails which were deleted by pressing shift+del in the past 7 days

Sunday 25 January 2009

How to disable auto-start applications on windows startup?

Hi friends,
It may be frustrating, if it takes time to start up your computer. The reason behind is that many applications or programs loads automatically when the computer starts. I obviously don’t like this applications because it delays the startup of my computer. So i disable most of the auto-start applications except the anti-virus application.
So by using this tip, you can minimize the startup time of windows XP and Vista. You can disable some Windows optional applications which you rarely use like windows messenger, yahoo messenger, Quick time, Sound Man and many other auto-start up programs that run automatically when you start your computer.
Follow the given steps to disable the windows auto-startup applications:
To use this features, you will need to be logged into your computer with administrative rights.
Click start button and type msconfig in Run option then hit Enter for next.
The pictures are taken from Windows XP
msconfig, auto-startup, windows XP statrp-up, windows XP msconfig


A small System Configuration Utility dialog box will appear with many options like General, System.ini, Win.ini, Boot.ini, Services and Startup.
Now Select Startup tab and uncheck the applications that you want to disable from windows startup.

startup, auto-startup, windows start-up, windows XP startup, msconfig, windows XP msconfig

Now click on Apply button to implement the changes then click on OK button to end the configuration process.
Again close the all programs and restart your computer after any changes to go into effect.

Saturday 10 January 2009

Connect to PostgreSQL with JDBC driver

Here is an example to show you how to connect to PostgreSQL database with JDBC driver.

1. Download PostgreSQL JDBC Driver

Get a PostgreSQL JDBC driver at this URL : http://jdbc.postgresql.org/download.html


2. Java JDBC connection example

Code snippets to use JDBC to connect a PostgreSQL database

   1: Class.forName("org.postgresql.Driver");
   2: Connection connection = null;
   3: connection = DriverManager.getConnection(
   4:    "jdbc:postgresql://hostname:port/dbname","username", "password");
   5: connection.close();

See a complete example below :
File : JDBCExample.java


   1: import java.sql.DriverManager;
   2: import java.sql.Connection;
   3: import java.sql.SQLException;
   4:  
   5: public class JDBCExample {
   6:  
   7:     public static void main(String[] argv) {
   8:  
   9:         System.out.println("-------- PostgreSQL "
  10:                 + "JDBC Connection Testing ------------");
  11:  
  12:         try {
  13:  
  14:             Class.forName("org.postgresql.Driver");
  15:  
  16:         } catch (ClassNotFoundException e) {
  17:  
  18:             System.out.println("Where is your PostgreSQL JDBC Driver? "
  19:                     + "Include in your library path!");
  20:             e.printStackTrace();
  21:             return;
  22:  
  23:         }
  24:  
  25:         System.out.println("PostgreSQL JDBC Driver Registered!");
  26:  
  27:         Connection connection = null;
  28:  
  29:         try {
  30:  
  31:             connection = DriverManager.getConnection(
  32:                     "jdbc:postgresql://127.0.0.1:5432/testdb", "mkyong",
  33:                     "123456");
  34:  
  35:         } catch (SQLException e) {
  36:  
  37:             System.out.println("Connection Failed! Check output console");
  38:             e.printStackTrace();
  39:             return;
  40:  
  41:         }
  42:  
  43:         if (connection != null) {
  44:             System.out.println("You made it, take control your database now!");
  45:         } else {
  46:             System.out.println("Failed to make connection!");
  47:         }
  48:     }
  49:  
  50: }

3. Run it


Assume JDBCExample is store in c:\test folder, together with PostgreSQL JDBC driver, then run it :


   1: C:\test>java -cp c:\test\postgresql-8.3-603.jdbc4.jar;c:\test JDBCExample
   2: -------- MySQL JDBC Connection Testing ------------
   3: PostgreSQL JDBC Driver Registered!
   4: You made it, take control your database now!

Done…