Tuesday 24 May 2011

SQL Server function code for formatting numbers to have Comma seperator with Out any Loop

Hi,


SQL Server does't have any inbuild function to put thousand Comma sepeator. You can use the Below MS SQL server user function or Code for formatting Numeric Values to have Comma seperator.

This Approach is an optimal one and dont use any Loop.

View Alternate Approach 


CREATE
FUNCTION [fn_CommaSeperateNumeral]

(@completeValue NVARCHAR(200)

)
RETURNSNVARCHAR(200)
AS

BEGIN
DECLARE @intValue NVARCHAR(50), @precValue NVARCHAR(50)

SELECT @intValue = SUBSTRING(CONVERT(NVARCHAR,CONVERT(MONEY,@completeValue),1), 1, CHARINDEX('.',CONVERT(NVARCHAR,CONVERT(MONEY,@completeValue),1),1)-1)

IF CHARINDEX('.',@completeValue,1) >0

SELECT @precValue = SUBSTRING(@completeValue, CHARINDEX('.',@completeValue,1)+1,LEN(@completeValue))

SELECT @completeValue = @intValue

IF @precValue IS NOT NULL

SELECT @completeValue = @completeValue + '.' + ISNULL(@precValue,'')

RETURN @completeValue

END

Saturday 21 May 2011

Using the “Copy XAML” Feature in Expression Design to Create HTML5 SVG Path Data

Introduction

One of the things that I recently had someone show me was using the “Copy XAML” feature in Expression Design to create HTML5 SVG Path Data. I later found out that this was demoed at MIX11 in a session called HTML5 for Silverlight Developers. So with that said, I don’t take credit for discovering this, just documenting it for others to use.
If you want to see the final product, then click here. Go ahead and right click on the page and you will see it’s just path data (no image – just straight up HTML).
Let’s get started:
  1. Fire up Microsoft Expression Design 4.
  2. Create a New Document (Hitting CTRL-N).
  3. Draw something cool. (Yes, I’m a big fan of the Dark Knight.)
  4. Hit CTRL-A to select everything.
  5. Click Edit-> Copy XAML.
  6. Go ahead and open something like Notepad2 and paste what is in your clipboard.
  7. You now want to clean this up a bit. The only parts we are interested in keeping is the path data starting with M as shown below. Go ahead and remove everything else in Red.
  8. And ending with the Z from the Path Statement. Again, remove the part in Red below.
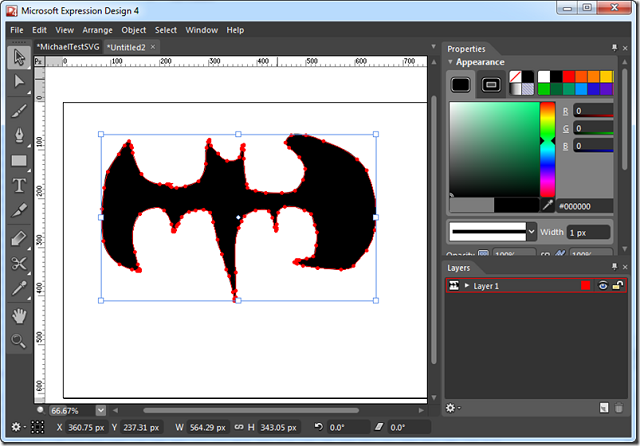
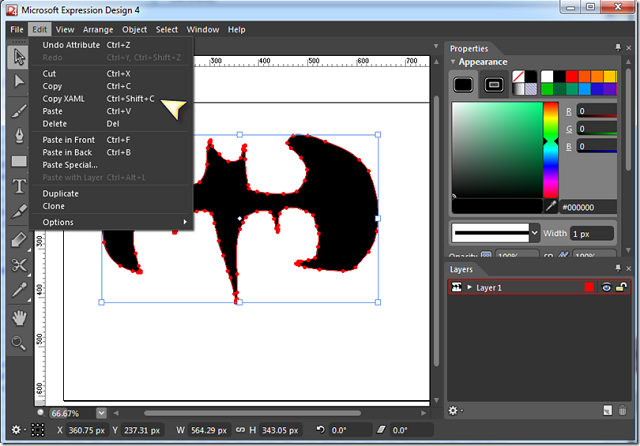
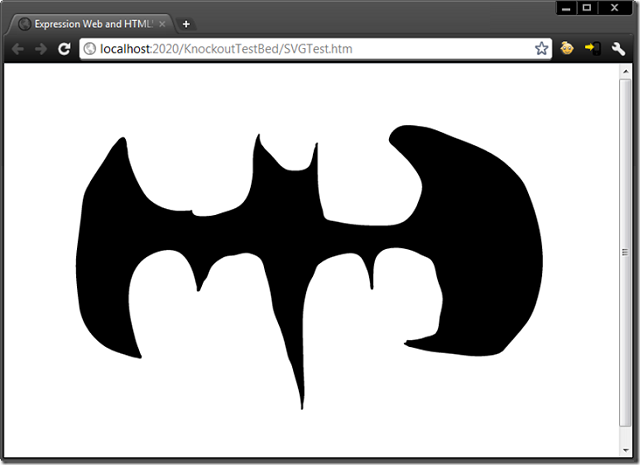
  9. Now that we have one continuous line of points, let’s drop that into the path of a HTML5 SVG as shown below:
    <!DOCTYPE html>
    <html lang="en">
     
    <head>
        <title>Expression Web and HTML5</title>
    </head>
    <body>
        <svg xmlns="http://www.w3.org/2000/svg">
     
        <path fill="black" d="M 218.806,168.146C 218.02,167.674 
        217.049,168.699 216.14,168.812C 215.258,168.922 214.362,168.812 
        213.473,168.812C 208.585,168.812 203.667,169.352 198.808,168.812C 
        184.373,167.208 168.511,159.798 160.813,147.482C 152.479,134.146 145.963,119.41 
        142.149,104.154C 141.28,100.678 141.685,96.9641 140.816,93.4883C 
        140.594,92.5995 140.263,91.731 140.149,90.822C 140.039,89.9401 140.259,89.0376 
        140.149,88.1556C 139.766,85.0927 138.546,79.7737 135.483,80.1566C 
        131.418,80.6648 129.048,85.2586 126.151,88.1556C 121.053,93.254 117.974,100.039 
        114.152,106.153C 106.638,118.177 97.8295,129.467 91.4886,142.149C 86.3243,
        152.477 86.098,164.668 84.8227,176.145C 83.2401,190.388 81.0727,204.563 
        79.4901,218.806C 77.0578,240.697 80.0911,262.943 82.823,284.798C 85.246,
        304.182 98.7341,323.407 115.486,333.458C 123.447,338.235 132.674,340.521 
        141.482,343.457C 144.959,344.616 148.511,345.669 152.148,346.123C 153.057,
        346.237 153.905,346.676 154.814,346.79C 155.696,346.9 156.786,347.345 
        157.48,346.79C 158.196,346.218 158.261,345.033 158.147,344.124C 158.024,
        343.138 157.163,342.388 156.814,341.457C 155.727,338.56 154.567,335.689 
        153.481,332.792C 150.491,324.818 148.88,316.39 146.815,308.128C 140.451,
        282.673 138.927,248.691 157.48,230.138C 169.285,218.333 194.244,210.479 
        206.807,221.472C 214.962,228.607 219.511,239.624 222.139,250.135C 223.028,
        253.69 223.916,257.246 224.805,260.801C 225.021,261.663 224.695,262.585 
        224.805,263.467C 224.919,264.376 224.686,265.662 225.472,266.133C 226.257,
        266.605 227.434,266.053 228.138,265.467C 228.902,264.831 229.027,263.689 
        229.471,262.8C 230.763,260.217 231.79,257.506 232.804,254.801C 233.194,
        253.761 234.137,253.024 234.804,252.135C 235.471,251.246 236.307,250.462 
        236.804,249.469C 238.983,245.11 239.971,240.103 242.803,236.137C 246.394,
        231.11 251.942,227.568 257.468,224.805C 261.912,222.583 267.313,223.344 
        272.133,222.139C 277.346,220.835 282.917,218.836 288.131,220.139C 292.951,
        221.344 298.229,223.033 301.462,226.805C 305.762,231.821 306.039,239.202 
        308.128,245.469C 312.152,257.542 314.549,270.171 316.127,282.798C 317.408,
        293.047 322.499,302.456 326.126,312.128C 330.006,322.474 332.112,333.404 
        334.791,344.124C 335.952,348.767 338.963,352.812 340.124,357.455C 342.804,
        368.175 346.393,378.665 348.79,389.451C 349.812,394.053 350.205,398.773 
        350.789,403.45C 350.9,404.331 350.679,405.234 350.789,406.116C 350.903,
        407.025 350.54,408.782 351.456,408.782C 354.204,408.782 352.86,
        403.466 353.456,400.783C 
        354.425,396.424 354.789,391.918 354.789,387.452C 354.789,374.779 353.456,
        362.129 353.456,349.456C 353.456,318.713 349.327,286.254 360.122,257.468C 
        361.866,252.816 365.043,248.788 366.787,244.136C 368.183,240.414 369.102,
        236.058 372.12,233.471C 378.307,228.168 386.212,224.782 394.117,222.805C 
        402.958,220.595 414.528,217.542 421.447,223.472C 425.528,226.97 427.264,
        232.559 429.446,237.47C 432.051,243.331 433.317,249.771 434.112,256.135C 
        434.461,258.924 433.968,264.134 436.779,264.134C 437.772,264.134 437.871,
        262.431 438.112,261.467C 438.327,260.605 438.112,259.69 438.112,258.801C 
        438.112,256.135 438.112,253.468 438.112,250.802C 438.112,242.754 437.952,
        234.341 440.778,226.805C 442.877,221.207 448.31,216.257 454.11,214.806C 
        467.435,211.475 482.765,214.802 494.771,221.472C 499.469,224.082 505.646,
        225.098 508.77,229.471C 513.223,235.706 513.234,244.13 515.436,251.469C 
        517.051,256.853 519.405,262.013 520.768,267.467C 522.93,276.113 520.93,
        285.483 518.768,294.13C 516.939,301.449 518.346,310.399 513.436,316.127C 
        510.321,319.761 504.586,319.779 500.104,321.46C 495.004,323.372 489.511,
        324.117 484.106,324.793C 483.224,324.903 482.329,324.793 481.44,324.793C 
        480.551,324.793 479.513,324.3 478.773,324.793C 477.947,325.344 478.143,
        326.756 477.44,327.459C 476.738,328.162 474.774,327.799 474.774,328.792C 
        474.774,329.903 476.498,330.203 477.44,330.792C 478.283,331.319 479.176,
        331.776 480.107,332.125C 484.194,333.658 488.56,334.309 492.772,335.458C 
        502.534,338.121 512.675,339.403 522.768,340.124C 538.339,341.236 553.853,
        345.162 569.429,344.124C 578.687,343.506 590.053,343.17 596.092,336.125C 
        605.017,325.713 614.528,315.766 622.755,304.795C 631.916,292.582 636.108,
        277.037 639.42,262.134C 648.329,222.042 638.769,177.679 622.089,140.149C 
        618.044,131.048 610.467,123.861 603.425,116.819C 585.079,98.4733 559.059,
        89.2664 534.766,80.1566C 522.464,75.543 510.497,68.9426 497.438,67.4916C 
        487.719,66.4116 476.855,63.7848 468.108,68.1581C 462.583,70.9209 457.542,
        76.693 456.776,82.823C 456.264,86.9241 461.186,89.8992 464.109,92.8217C 
        470.886,99.5995 478.355,105.818 484.106,113.486C 489.533,120.722 495.649,
        128.508 496.771,137.483C 497.674,144.705 494.661,151.999 492.105,158.814C 
        488.813,167.593 483.392,176.508 475.441,181.477C 467.57,186.397 457.392,
        186.81 448.111,186.81C 437.214,186.81 426.278,186.68 415.448,185.477C 
        408.514,184.706 401.553,183.836 394.784,182.144C 389.259,180.763 381.333,
        181.239 378.786,176.145C 377.46,173.493 377.724,170.291 376.786,167.479C 
        371.339,151.138 370.787,133.378 370.787,116.152C 370.787,109.931 370.787,
        103.709 370.787,97.4878C 370.787,94.8215 370.787,92.1552 370.787,89.4888C 
        370.787,88.6 371.649,87.0381 370.787,86.8225C 369.709,86.553 368.672,
        87.8577 368.121,88.8223C 367.68,89.5939 368.336,90.6263 368.121,91.4885C 
        367.88,92.4526 367.136,93.2245 366.787,94.1549C 366.466,95.0127 366.343,
        95.9324 366.121,96.8212C 364.722,102.418 364.035,108.326 361.455,113.486C 
        357.646,121.103 345.242,121.208 336.791,120.152C 328.631,119.132 322.813,
        111.064 317.46,104.82C 312.957,99.566 307.13,95.3571 303.462,89.4888C 
        301.972,87.1055 301.144,84.2787 300.796,81.4898C 300.686,80.6079 300.906,
        79.7054 300.796,78.8235C 300.682,77.9144 301.045,76.1572 300.129,76.1572C 
        299.018,76.1572 298.718,77.8813 298.129,78.8235C 297.603,79.6661 297.145,
        80.5594 296.796,81.4898C 295.434,85.1232 295.071,89.0571 294.13,92.8217C 
        291.377,103.834 293.384,115.535 292.13,126.817C 290.754,139.202 287.593,
        153.371 278.132,161.48C 270.644,167.898 260.036,169.349 250.802,172.812C 
        244.917,175.018 238.422,175.478 232.138,175.478C 228.521,175.478 224.416,
        175.581 221.472,173.478C 220.568,172.833 219.969,171.806 219.473,170.812C 
        219.063,169.993 219.592,168.617 218.806,168.146 Z" />
        
        </svg>
    </body>
    </html>
  10. Now load the page into a browser and you will get the following. You can test this in a browser by going here:

Conclusion


That was pretty easy to do and only took about 5 minutes. There are a lot of things you can do with path data as sometimes it is easier to drop in path data instead of add an image to a project. I hope you found this post helpful. 

Monday 16 May 2011

How to Import Your AIM Buddies into Google Talk

AIM has integrated their instant messaging service with Google Talk, allowing you to talk to your friends on both protocols with only one login. Here's how to import all your AIM buddies into Google Talk in one fell swoop.
You may have noticed that you can no longer sign into AIM via Google Chat—that's because Google has integrated AIM directly with Google Talk for single-login goodness. The integration went live last week, but you had to manually add all your AIM buddies to Google Talk if you wanted to contact them. Luckily, AIM now has a tool that will automatically import all your buddies for you.


Importing Your Contacts


 To set it up, just head to the Import to Gmail page and log in to AIM. Once you've logged in, it will prompt you to enter your Gmail credentials as well. When it's done, it will tell you your contacts are imported—that's it! If you head to Gmail, you should see all your AIM contacts pop up in the Chat sidebar. Note that it only imports the 38 contacts you chat with the most, so if you have more than that, it looks like you'll have to add them manually.

The Upsides: You Only Need One Login; You Get AIM on Android

The Main idea behind the switch is that you won't have to deal with two separate logins within Gmail from now on. The other really cool part about this is that you can log into both protocols from one IM client. Since nearly every IM client under the sun has both GTalk and AIM, this isn't a big deal for desktop users, but it does mean that Android users can now IM their AIM buddies right from Google's official GTalk app, which is great, since it's probably the best IM client on Android.

The Downsides: It's Confusing and Kind of Buggy

Unfortunately, the whole implementation still seems confusing at best, and buggy at worst. Your AIM buddies will no longer see your AIM screen name when you log in; instead it will create a new contact for them using your Gmail address. However, I had the problem where some of my contacts weren't even showing up in the sidebar—some were only showing their Google Talk contacts, some were showing only AIM, and some were showing up twice, like they used to (though some showed up after a small wait, so perhaps it just takes awhile for everything to register). It's not combining them, either (which would be awesome)—it's just excluding some contacts from my buddy list entirely. In addition, the 48 contact limit for the importer is kind of a drag if you have a lot of AIM buddies.

If you use a desktop IM client, of course, you'll be unaffected by all this, and can continue using GTalk and AIM separately. In fact, we'd recommend doing so. Unless you're really itching to get AIM in the Gmail web interface or on Android's Talk app, using a desktop client is still the easiest way to get access to both, and we'd recommend against importing your AIM contacts into Gmail—at least for now. Have you tried the new AIM integration in Gmail? How does it work for you? Share your thoughts with us in the comments.

How to Write-Protect USB Flash Drive

USB Write Protect

Many a time, it becomes necessary for us to write protect our USB flash drive so as to protect it from viruses and other malware programs. Because flash drives are so popular and most widely used to move data between computers, they are the prime target for attackers as a means to get infections spread around the computer world. Also, since USB drive is not a Read-Only Memory (ROM), the data inside it can easily be modified or deleted by malware programs.
But unfortunately, most of the new flash drives do not come with a write-protect feature as the manufacturers wish to cut down the cost of production. Hence, the only way to write-protect your USB flash drives is to enable this feature on your own computer.
This can be done by adding a small entry to the Windows registry which acts as a switch that can be enabled to make use of the write protection or disabled to allow write access. Just follow these steps:
1. Open the Registry Editor (Open the “Run” dialog box, type regedit and hit “Enter”).
2. Navigate to the following Registry key:
HKEY_LOCAL_MACHINE\SYSTEM\CurrentControlSet\Control\
3. Create a New Key named as StorageDevicePolicies. To do this right-click on Control, and click on New->Key and name it as StorageDevicePolicies.
4. Now right-click on StorageDevicePolicies and create a New->DWORD (32-bit) Value and name it as WriteProtect.
Write-Protect USB Drive
5. Double-click on WriteProtect and set the Value data to 1.
Now the right-protection for USB drives is enabled on your computer (no restart required) and thus it would not be possible for anyone or any program to add/delete the contents from your USB flash drive. Any attempt to copy or download the files onto the USB drive will result in the following error message being displayed.
USB-Write Protect Error
To revert and remove the write-protection, all you need to do is just change the Value data for WriteProtect (Step-5) from 1 back to 0. Now write access to all the USB devices is re-enabled.

Thursday 12 May 2011

Database Mirroring in SQL Server 2008

What is Database Mirroring?

Database mirroring is the feature in SQL Server 2005 and SQL Server 2008 that provides a high availability solution for Databases. This feature can be enabled and used only on a database with Full recovery models. The database can be mirrored from one SQL Server instance to another SQL Server instance. The source instance is called Principal server; the target instance is called Mirrored server. We could have one more server called Witness server--we will talk about that in later part of this article series.

How does database mirroring work?


The principle server sends the active transaction log record to the mirrored server. The mirrored server applies the transaction log record one by one in sequence.

Modes of Database Mirroring


Database mirroring can be configured in two different modes, High-Safety mode also known as synchronous mode and High-Performance mode also known as asynchronously. The term synchronous and asynchronous says it all.

In the synchronous mode, the principal server sends the transaction and waits until the transaction is committed on the mirrored server. Then the transaction is committed on the principal server.

In Asynchronous mode, the principal server sends the transaction to the mirrored server and does not wait for the transaction on the mirrored server to commit.

We will discuss transaction safety in detail in a future installment of this series.

Now let's setup database mirroring between the SQL Server instance PowerPC\SQL2008 [our principal server] and PowerPC\SQL2k8 [our mirrored server].

What are the Pre-Requisites of database mirroring?


The following are the pre-requisites for database mirroring.

  • Edition of SQL Server should be Standard, Enterprise or Developer edition
  • Principal Database involved in database mirroring should be in full recovery mode
  • Before configuring database mirroring, take a full backup, transactional log backup on the principal server and restored it on the mirrored server with NORECOVERY option.

Now let's create a database DB1 on the principal server, PowerPC\SQL2008, using the following transact SQL statement. In this part of article series, we are going to discuss database mirroring with synchronous mode and with no witness server.
USE [master]
GO

/****** Object:  Database [DB1]    Script Date: 06/20/2009 21:10:33 ******/
IF  EXISTS (SELECT name FROM sys.databases WHERE name = N'DB1')
DROP DATABASE [DB1]
GO


USE [master]
GO

/****** Object:  Database [DB1]    Script Date: 06/20/2009 21:10:13 ******/
CREATE DATABASE [DB1] ON  PRIMARY 
( NAME = N'DB1', FILENAME = N'C:\Program Files\Microsoft SQL Server\MSSQL10.SQL2008\MSSQL\DATA\DB1.mdf' , \
 SIZE = 1280KB , MAXSIZE = UNLIMITED, FILEGROWTH = 1024KB )
 LOG ON 
( NAME = N'DB1_log', FILENAME = N'C:\Program Files\Microsoft SQL Server\MSSQL10.SQL2008\MSSQL\DATA\DB1_log.LDF' , 
 SIZE = 504KB , MAXSIZE = 2048GB , FILEGROWTH = 10%)
GO

Now let's create a database DB1 on the mirrored server, PowerPC\SQL2K8, using the following transact SQL statement.
USE [master]
GO

/****** Object:  Database [DB1]    Script Date: 06/20/2009 21:10:33 ******/
IF  EXISTS (SELECT name FROM sys.databases WHERE name = N'DB1')
DROP DATABASE [DB1]
GO


USE [master]
GO

/****** Object:  Database [DB1]    Script Date: 06/20/2009 21:10:13 ******/
CREATE DATABASE [DB1] ON  PRIMARY 
( NAME = N'DB1', FILENAME = N'C:\Program Files\Microsoft SQL Server\MSSQL10.SQL2K8\MSSQL\DATA\DB1.mdf' , 
 SIZE = 1280KB , MAXSIZE = UNLIMITED, FILEGROWTH = 1024KB )
 LOG ON 
( NAME = N'DB1_log', FILENAME = N'C:\Program Files\Microsoft SQL Server\MSSQL10.SQL2K8\MSSQL\DATA\DB1_log.LDF' , 
 SIZE = 504KB , MAXSIZE = 2048GB , FILEGROWTH = 10%)
GO

If the target server does not have the database with same name, you will get the following error when configuring database mirroring. [Refer Fig 1.0]

Database does not exist on the mirror server instance
Fig 1.0

Note: Instead of creating the DB1 database on the mirrored server, you could restore the database backup and tranlog backup using the with replace option to create and restore at the same time.

Now let's backup the database and transaction on the principal server using the following transact SQL statement.
use master
go
Backup database DB1 to disk ='C:\Backups\DB1.Bak' with init
go
Backup log DB1 to disk ='C:\Backups\DB1.trn' with init
go

Restore the database on the target server using the following transact SQL statement.
use master
go
restore database DB1 from disk ='C:\Backups\DB1.Bak' with norecovery, 
replace,
move 'DB1' to 'C:\Program Files\Microsoft SQL Server\MSSQL10.SQL2K8\MSSQL\DATA\DB1.mdf',
move 'DB1_log' to 'C:\Program Files\Microsoft SQL Server\MSSQL10.SQL2K8\MSSQL\DATA\DB1_log.ldf'
go
restore log DB1 from disk ='C:\Backups\DB1.trn' with norecovery, replace,
move 'DB1' to 'C:\Program Files\Microsoft SQL Server\MSSQL10.SQL2K8\MSSQL\DATA\DB1.mdf',
move 'DB1_log' to 'C:\Program Files\Microsoft SQL Server\MSSQL10.SQL2K8\MSSQL\DATA\DB1_log.ldf'
go

On the target server, if the database is not in restore mode you will get the following error. [Refer Fig 1.2]

Alter failed for database
Fig 1.2

Configure the database DB1 on the principal server for database mirroring. Using SQL Server management studio, expand the databases and click on the Database DB1. Right click on the database DB1 and select properties. In the properties window select the "Mirroring" option as shown below. [Refer Fig 1.3]

In the properties window select the
Fig 1.3

Now click on the "Configure Security" button and you will see the following screen. Since we are not going to setup the witness server, select the option "No" and click next. [Refer Fig 1.4]

click on the
Fig 1.4

Select the default port and the endpoint name chosen by the SQL server management studio and click Next. [Refer Fig 1.5] If you are choosing some other port, then make sure that port is open and available.

configure database mirroring security wizard
Fig 1.5

Now select the mirrored server name, click on the "Connect" button and make sure you can connect to the mirrored server. Select the default port and the endpoint name chosen by the SQL server management studio and click Next. [Refer Fig 1.6] If you are choosing some other port, then make sure that port is open and available.

configure database mirroring security wizard
Fig 1.6

Type the appropriate service account you want to use for the database mirroring. [Refer Fig 1.7]

Type the appropriate service account you want to use for the database mirroring
Fig 1.7

Double check the summary details and click finish. This will configure database mirroring. [Refer Fig 1.8, 1.9, 1.10]

Double check the summary details and click finish
Fig 1.8

Configuring Endpoints - in progress\
Fig 1.9

Configuring Endp;oints - success\
Fig 1.10

On the next screen, click on the button "Start Mirroring". [Refer Fig 1.11]

click on the button
Fig 1.11

On the next screen, click on the "Yes" button. [Refer Fig 1.12]

On the next screen, click on the \
Fig 1.12

The following screen shows that database mirroring is configured and running. [Refer Figure 1.13]

database mirroring is configured and running
Fig 1.13

Click OK and refresh the databases. You can see the caption of the DB1 database has changed in both principal and mirrored server. [Refer Fig 1.14]

Click OK and refresh the databases\
Fig 1.14


Monday 9 May 2011

How to get the Windows user identity name in Silverlight.


Silverlight Windows User Identity Name

Introduction

This article explains how to get the Window User Identity Name in Silverlight without using WCF.

Background

I was looking for Windows Authentication for Silverlight on the web. After Binging and Googling for a while, I found most of them use a WCF service to do the Windows authentication, where the primary objective is to just get the current user name. I thought using WCF for just getting the Windows user is kind of overkill, and moreover, you have to configure your basicHttpBinding to incorporate Windows authentication with WCF, which is kind of trivial, but can turn painful if not configured properly.

Below are three quick and easy steps to achieve the objective:

  1. Open the ASPX page that carries the Silverlight XAP file inside the Object tag and add a new param (let's call it Initparams):

<param name="Initparams"
  value="UserAccount=<%=HttpContext.Current.User.Identity.Name%>" />

  1. Open the App.xaml.cs file and declare a global variable:

public static string UserID = string.Empty;

To the application_startup method in App.xaml.cs, assign the param value to the global variable (this should be before the RootVisual statement):

UserID = e.InitParams["UserAccount"];

  1. Declare a variable in your Mainpage.xaml or the navigation page, and assign the global variable value to the local variable, and you have the current logged on Windows user name.

string UserAccount = App.UserID;


Observable Collection, second look.

Observable Collection by definition provide notification when an item is added, removed or refreshed. It is pretty cool nifty item to have. So if you want a type of collection that automatically notifies the UI to update when underlying data changes, it has to be Observable Collection. Less code, more feature out of the box. But I want to point out two things when using Observable Collection.

Most of the people forget the very import thing, if you are using Observable collection then for every change, Observable Collection fires an event. If it is very small numbers then you will not notice the performance issue. But if for some reason you are adding and/or removing 100s or 1000s of rows then you will see visible performance degradation. If your data is flat or if it does not have a collection inside the collection then there should not be any performance hit either. I wrote a sample code to time it so that I  can document the performance issue if any.

Before we go into the example, I would like to point out the second issue of Memory Leak when using Observable Collection. Once you initialize a bound observable collection, do not new up again, rather, clear the collection and then add new items to the same collection. You can read about it in here and also here.

Now lets look at the performance timings.

Scenario 1: Simple observable collection class.

My backend data model is PERSON class

public class Person
{
    public string Name { get; set; }
    public int Age { get; set; }
}

Now the XAML

<Grid x:Name="LayoutRoot" Background="White">
        <Grid.RowDefinitions>
            <RowDefinition Height="80"/>
            <RowDefinition Height="*"/>
        </Grid.RowDefinitions>
        <Grid HorizontalAlignment="Center">
            <Grid.ColumnDefinitions>
                <ColumnDefinition Width="Auto"/>
                <ColumnDefinition Width="Auto"/>
                <ColumnDefinition Width="Auto"/>
            </Grid.ColumnDefinitions>
            <Button Name="Add" Content="Add" Click="Add_Click" Grid.Column="0" HorizontalAlignment="Center" Margin="4,4,4,4"/>
            <Button Name="Clear" Content="Clear" Click="Clear_Click" Grid.Column="1" HorizontalAlignment="Center" Margin="4,4,4,4"/>
            <TextBox Name="Numbers" Grid.Column="2" Width="100"/>
        </Grid>
        <c1:C1FlexGrid Name="_grid" Grid.Row="1" />
    </Grid>

The top part has two buttons, one to add rows and another one to remove rows from the collection. The third is a textbox, where you can enter how many rows you want to add or remove. What we are currently interested in is, adding rows to the grid on the fly.

private void Add_Click(object sender, RoutedEventArgs e)
{
     DateTime dt = DateTime.Now;
     for(int i=0;i<int.Parse(Numbers.Text);i++)
        _people.Add(new Person() { Age = i + 10, Name = "Name" + i.ToString() });
     DateTime dt1 = DateTime.Now;
     TimeSpan dt2 = dt1.Subtract(dt);
      Debug.WriteLine(string.Format("{0}:{1}:{2}:{3}", dt2.Hours, dt2.Minutes, dt2.Seconds, dt2.Milliseconds));
}

Armed with above code and XAML if you would run, the time it takes to add 1000 new object to the collection is 107ms. Not bad, no performance hit.

Scenario 2: Hierarchical Collection using Observable Collection.

We modify the Person Class as follows to include a children of same type.

public class Person
{
    public string Name { get; set; }
    public int Age { get; set; }
    public ObservableCollection<Person> Children { get; set; }
    public Person()
    {
       Children = new ObservableCollection<Person>();
    }
}

With this change, if you would run the same code, it takes 10.263s. You can see why the time jumped by 10 seconds, if I would remove the constructor from the code, it still comes down to 9.623ms. So the constructor is not the problem here.Lets move on to the third scenario.

Scenario 3: Hierarchical Collection using Custom Class derived off of Observable collection.

This is an interesting scenario that I did not think about it till I ran into a performance issue with grid. The idea behind this scenario is that, since by definition, Observable Collection fires an event notification for any change to the data, in our case, when we are adding a bunch of data, we do not want to fire event for each and individual change rather, fire an event at the end of all the changes are made. So the solution is to derive a new class off of Observable Collection and make sure you turn off the notification before adding range and at the end turn the notification on. I followed the Smart Collection explained in Daamir blog. Just in case, I added the class definition right here as well.

public class SmartCollection<T> : ObservableCollection<T>
    {
        public SmartCollection()
            : base()
        {
            _suspendCollectionChangeNotification = false;
        }
        public SmartCollection(List<T> list) : base(list) { }
        bool _suspendCollectionChangeNotification;
        protected override void OnCollectionChanged(NotifyCollectionChangedEventArgs e)
        {
            if (!_suspendCollectionChangeNotification)
            {
                base.OnCollectionChanged(e);
            }
        }
        public void SuspendCollectionChangeNotification()
        {
            _suspendCollectionChangeNotification = true;
        }
        public void ResumeCollectionChangeNotification()
        {
            _suspendCollectionChangeNotification = false;
        }
        public void AddRange(IEnumerable<T> items)
        {
            this.SuspendCollectionChangeNotification();
            int index = base.Count;
            try
            {
                foreach (var i in items)
                {
                    base.InsertItem(base.Count, i);
                }
            }
            finally
            {
                this.ResumeCollectionChangeNotification();
                var arg = new NotifyCollectionChangedEventArgs(NotifyCollectionChangedAction.Reset);
                this.OnCollectionChanged(arg);
            }
        }
        public void Repopulate(IEnumerable<T> items)
        {
            this.Clear();
            this.AddRange(items);
        }
    }
If you look at the code, three piece of information interesting to current article. SuspendCollectionChangeNotification, which is to turn off the notification and ResumeCollectionChangeNotification to turn on the notification. These two methods need to be invoked if you are adding one row at a time through your code. On the other hand, if you are adding a collection to the Observable Collection, then call AddRange method, which internally will take care of turning on and off the notification. Now lets look at the code change
public class Person
    {
        public string Name { get; set; }
        public int Age { get; set; }
        public SmartCollection<Person> Children { get; set; }
        public Person()
        {
            Children = new SmartCollection<Person>();
        }
    }

Modify the code bind and change all Observable Collection Reference to SmartCollection. Also change the for loop where we add individual items to SmartCollection to List as follows

private void Add_Click(object sender, RoutedEventArgs e)
        {
            DateTime dt = DateTime.Now;
            Debug.WriteLine(string.Format("{0}:{1}:{2}:{3}", dt.Hour, dt.Minute, dt.Second, dt.Millisecond));
            List<Person> ppl = new List<Person>();
            for(int i=0;i<int.Parse(Numbers.Text);i++)
                ppl.Add(new Person() { Age = i + 10, Name = "Name" + i.ToString() });
            _people.AddRange(ppl);
            DateTime dt1 = DateTime.Now;
            TimeSpan dt2 = dt1.Subtract(dt);
            Debug.WriteLine(string.Format("{0}:{1}:{2}:{3}", dt2.Hours, dt2.Minutes, dt2.Seconds, dt2.Milliseconds));
        }

With these changes if you would run the program, you will see the 1000 row insertion only took 31ms.  Now the question is, why can’t we do the step as creating temporary collection and then assign it back to observable collection? Wouldn’t it work the same way? One approach would be

var concatList = _people.Concat(pp);

_people = new ObservableCollection(concatList)

in my opinion, newing Observable collection had some memory problem in Silverlight. The recommendation was always new up only once and from there on, if you want to add items to it, you add item to it or clear and then add item to it. That is the only reason I did not try it out.

So the bottom line is that, when we use Observable Collection take care not to fire event when you are working on too large of data. As I mentioned earlier, if your data is flat then you will not incur any performance problems but if you have hierarchical data then I would recommend you to switch to a model to turn on and off the notification model.

If any of you have good way to do it, please feel free to drop me a note. I am very much interested in learning and understand new ways of doing things.

Saturday 7 May 2011

Creating TreeView using Grid in Silverlight (Component One – Cell Factory) – III

In the previous blog post, we took our first step in creating tree view look and feel using C1FlexGrid. With some basic changes we were able to get to the result close enough.

image

Few things missing for the grid to look like tree view, they are

1. When parent do not have a child, the expand and collapse icon should not appear.

2. We are missing check box along with parent id.

We can resolve both the problems using Cell Factory.  What does cell factory do? Cell Factory is used by C1FlexGrid to draw cells. It has bunch of methods that you can override so that you can implement your own drawing mechanism. In our case, when it create the cell content, I need to check if the content is a group row, then add my own cell creating logic put check box else let the grid do its work. So we create our custom class off of CellFactory. All the code you are going to see below is stripped down version of Component One’s iTune sample code.

public class MyCellFactory:CellFactory
{
}

The method we need to override to achieve custom cell content create is ‘CreateCellContent’ method. In this method, we will check, if the cell belongs to a group row and if it is first column then create me the custom cell.

static Thickness _emptyThickness = new Thickness(0);
//bind a cell to a range
 public override void CreateCellContent(C1FlexGrid grid, Border bdr, CellRange range)
{
     var row = grid.Rows[range.Row];
     var col = grid.Columns[range.Column];
      var gr = row as GroupRow;
      if (gr != null)
          bdr.BorderThickness = _emptyThickness;
      if (gr != null && range.Column == 0)
     {
          BindGroupRowCell(grid, bdr, range);
          return;
      }
      base.CreateCellContent(grid, bdr, range);
}
One point of interest in the above method call is ‘BindGroupRowCell’. This method will create the custom cell for us. This has two important parts in it, first one is to make sure the group row has a databinding source and also create custom cell and add it to its cell content.
private void BindGroupRowCell(C1FlexGrid grid, Border bdr, CellRange range)
{
     var row = grid.Rows[range.Row];
     var gr = row as GroupRow;
     if (range.Column == 0)
     {
          if (gr.DataItem == null)
         {
              gr.DataItem = BuildGroupDataItem(gr);
         }
        Type cellType = typeof(ParentCell);
        bdr.Child = (ImageCell)new ParentCell(row);
     }
}

In our grid, every row has an associated data row except the group row. Since group row does not have data item, we will, create an temporary data row, that we can use to bind it to the grid. When we group the rows to generate the grouping in data grid, the group knows about all the children of the group. We conveniently pick the first row and use the data to generate the dummy row that we use to bind it to group row.

CustomCellFactoryForTreeView.MainPage.Person BuildGroupDataItem(GroupRow gr)
{
     var gs = gr.GetDataItems().OfType<CustomCellFactoryForTreeView.MainPage.Person>();
     CustomCellFactoryForTreeView.MainPage.Person p = new CustomCellFactoryForTreeView.MainPage.Person();
      if (gs != null && gs.Count() > 0)
            p = gs.ElementAt(0) as CustomCellFactoryForTreeView.MainPage.Person;
       return new CustomCellFactoryForTreeView.MainPage.Person()
      {
            ParentID = p.ParentID,
            Description = p.Description,
            ChildID = p.ChildID,
            ChildDescription = p.ChildDescription
       };
 }

Now lets look at the main core functionality to  create the check box and text in the group row. Again following code is purely stripped down version itunes sample in C1 samples.  Lets first create the ParentCell

public  class ParentCell : ImageCell
    {
        const double ALPHA = 0.5;
        GroupRow _gr;
        Image _nodeImage;
        static ImageSource _bmpExpanded, _bmpCollapsed;
        public ParentCell(Row row)
            : base(row)
        {
            CustomCellFactoryForTreeView.MainPage.Person per = row.DataItem as CustomCellFactoryForTreeView.MainPage.Person;
            if (per != null && per.ChildID != null)
            {
                // create collapsed/expanded images
                if (_bmpExpanded == null)
                {
                    _bmpExpanded = ImageCell.GetImageSource("Expanded.png");
                    _bmpCollapsed = ImageCell.GetImageSource("Collapsed.png");
                }
                // store reference to row
                _gr = row as GroupRow;
                // initialize collapsed/expanded image
                _nodeImage = new Image();
                _nodeImage.Source = _gr.IsCollapsed ? _bmpCollapsed : _bmpExpanded;
                _nodeImage.Width = _nodeImage.Height = 9;
                _nodeImage.VerticalAlignment = VerticalAlignment.Center;
                _nodeImage.Stretch = Stretch.None;
                _nodeImage.MouseLeftButtonDown += img_MouseLeftButtonDown;
                _nodeImage.MouseEnter += img_MouseEnter;
                _nodeImage.MouseLeave += img_MouseLeave;
                _nodeImage.Opacity = ALPHA;
                Children.Insert(0, _nodeImage);
            }
            // make text bold
            TextBlock.FontWeight = FontWeights.Bold;
        }
        void img_MouseLeftButtonDown(object sender, MouseButtonEventArgs e)
        {
            var img = sender as Image;
            var cell = img.Parent as NodeCell;
            cell.IsCollapsed = !cell.IsCollapsed;
        }
        void img_MouseEnter(object sender, MouseEventArgs e)
        {
            var img = sender as Image;
            img.Opacity = 1;
        }
        void img_MouseLeave(object sender, MouseEventArgs e)
        {
            var img = sender as Image;
            img.Opacity = ALPHA;
        }
        public override Row Row
        {
            set
            {
                // update image
                _gr = value as GroupRow;
                _nodeImage.Source = _gr.IsCollapsed ? _bmpCollapsed : _bmpExpanded;
                _nodeImage.Opacity = ALPHA;
                // update text
                base.Row = value;
            }
        }
        public bool IsCollapsed
        {
            get { return _gr.IsCollapsed; }
            set
            {
                _gr.IsCollapsed = value;
                _nodeImage.Source = value ? _bmpCollapsed : _bmpExpanded;
            }
        }
    }

The point of interest in here is the constructor, where we check if there are any children available. If there is any child available, then we show expand or collapse icon. If there are no children then do not show any icon. We also add event handler which listens to the click event on the image and based on the event, it toggles the state. With this change, we took care the icon to show only when there is children. One thing left to do is, adding check box to the control. This is accomplished at base class ‘ImageCell’.

The Image cell is derived from StackPanel so it is easy to customize it to the look you want.

public abstract class ImageCell:StackPanel
    {
        public ImageCell(Row row)
        {
            Orientation = System.Windows.Controls.Orientation.Horizontal;
            CheckBox box = new CheckBox();
            box.VerticalAlignment = System.Windows.VerticalAlignment.Center;
            box.Click += new RoutedEventHandler(box_Click);
            Children.Add(box);
            TextBlock tb = new TextBlock();
            tb.VerticalAlignment = System.Windows.VerticalAlignment.Center;
            Children.Add(tb);
            BindCell(row.DataItem);
        }
        void box_Click(object sender, RoutedEventArgs e)
        {
            int k = 0;
        }
        public TextBlock TextBlock
        {
            get { return Children[Children.Count - 1] as TextBlock; }
        }
        public CheckBox CheckBox
        {
            get
            {
                return Children[Children.Count - 2] as CheckBox;
            }
        }
        public virtual Row Row
        {
            set { BindCell(value.DataItem); }
        }
        private void BindCell(object dataItem)
        {
            var binding = new Binding("Description");
            binding.Source = dataItem;
            TextBlock.SetBinding(TextBlock.TextProperty, binding);
            var cbbinding = new Binding("TwoState");
            cbbinding.Source = dataItem;
            CheckBox.SetBinding(CheckBox.IsCheckedProperty, cbbinding);
        }
        public static ImageSource GetImageSource(string imageName)
        {
            var bmp = new BitmapImage();
            bmp.CreateOptions = BitmapCreateOptions.None;
            var fmt = "Resources/{0}";
            bmp.UriSource = new Uri(string.Format(fmt, imageName), UriKind.Relative);
            return bmp;
        }
    }

The final result of course is like the following

image

Our requirement is to have a check box and a text block in the group row and that is what we did in the constructor of the ImageCell. Once it is created we need to bind it to the proper fields. That’s is what done in the BindCell method. One thing, it is important here on how you get to the control for doing the binding. Please see the TextBlock getter property, which in turn take the first child from the children collection and return it for binding. If you remember the children have three elements and they are in the following order. First element (at 0) is image for collapse and expand. Second one is the check box (at 1) and third one is the TextBlock (at 2). I was so lazy to I hard coded it to get the elements by hard coded index. You can traverse and identify the control to make it flexible if you want to move around the control. One another thing, you may want is to listen to the check box click event that you can listen with click event.

I would like to thank Bernardo @ Component One to take time to answer my questions and excellent example of itunes on their web site. This three part blog was more for me to understand how the whole components works together and what you can do with this. You can customize the grid any way you want. In this whole example we looked at only one method, create cell, but there are five or six more methods available completely change the look of the grid.