IntroductionAs a matter of fact Microsoft Windows services, formerly known as NT services enable you to create long-running executable applications that run in its own Windows session, which then has the ability to start automatically when the computer boots and also can be manually paused, stopped or even restarted.
This makes services ideal for use on a server or whenever you need long-running functionality that does not interfere with other users who are working on the same computer. You can also run services in the security context of a specific user account that is different from the logged-on user or the default computer account.
Windows services don’t have any interface to the user, so it can not be debugged like any regular application, but it’s debugged as a process. .NET has a very nice tool that enables processes debugging while it’s in the run status, by easily pressing Ctrl + Alt + P shortcut.
After searching the MSDN, I’ve found some nice code that helped me to create this simple Windows service. Hope it can help as a basic architecture for and usage of such a Windows service.
The project template automatically adds a component class that is called
Click the designer. Then, in the Properties window, set the
Set the
In the code editor, edit the
To add custom event log functionality to your service:
To define what happens when the service is stopped, in the code editor, locate the
Now that the project is built, it can be deployed. A setup project will install the compiled project files and run the installers needed to run the Windows service. To create a complete setup project, you will need to add the project output, MyNewService.exe, to the setup project and then add a custom action to have MyNewService.exe installed.

This makes services ideal for use on a server or whenever you need long-running functionality that does not interfere with other users who are working on the same computer. You can also run services in the security context of a specific user account that is different from the logged-on user or the default computer account.
Windows services don’t have any interface to the user, so it can not be debugged like any regular application, but it’s debugged as a process. .NET has a very nice tool that enables processes debugging while it’s in the run status, by easily pressing Ctrl + Alt + P shortcut.
Background
I’ve searched well so many sites about a code that I can with the help of it, build a simple Windows service, but I found a lot of code on how to manage the current Windows services of the system and that’s through theServiceController class.After searching the MSDN, I’ve found some nice code that helped me to create this simple Windows service. Hope it can help as a basic architecture for and usage of such a Windows service.
Using the code
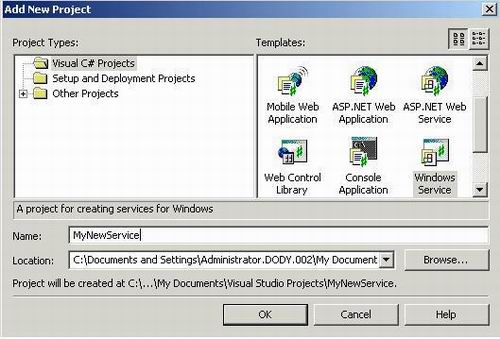
At first you should simply open VS.NET and then at the File menu click on New, Project. From the New Project Dialog Box, choose the Windows service template project and name it MyNewService like shown below:The project template automatically adds a component class that is called
Service1 by default and inherits from System.ServiceProcess.ServiceBase.Click the designer. Then, in the Properties window, set the
ServiceName property for Service1 to MyNewService.Set the
Name property to MyNewService. Set the AutoLog property to true.In the code editor, edit the
Main method to create an instance of MyNewService. When you renamed the service in step 3, the class name was not modified in the Main method. To access the Main method in VC#, expand the Component Designer generated code region.static void Main()
{
System.ServiceProcess.ServiceBase[] ServicesToRun;
//Change the following line to match.
ServicesToRun = new
System.ServiceProcess.ServiceBase[] { new MyNewService() };
System.ServiceProcess.ServiceBase.Run(ServicesToRun);
}
In the next section, you will add a custom event log to your Windows service. Event logs are not associated in any way with Windows services. Here the EventLog component is used as an example of the type of components you could add to a Windows service.To add custom event log functionality to your service:
- In the Solution Explorer, right-click Service1.vb or Service1.cs and select View Designer.
- From the Components tab of the Toolbox, drag an
EventLogcomponent to the designer. - In the Solution Explorer, right-click Service1.vb or Service1.cs and select View Code.
- Edit the constructor to define a custom event log.
public MyNewService()
{

    InitializeComponent()
    if(!System.Diagnostics.EventLog.SourceExists("DoDyLogSourse"))
    System.Diagnostics.EventLog.CreateEventSource("DoDyLogSourse",
                                                          "DoDyLog");

    eventLog1.Source = "DoDyLogSourse";
    // the event log source by which

    //the application is registered on the computer

    eventLog1.Log = "DoDyLog";
}
To define what happens when the service starts, in the code editor, locate the OnStart method that was automatically overridden when you created the project, and write code to determine what occurs when the service begins running:protected override void OnStart(string[] args)
{
eventLog1.WriteEntry("my service started");
}
The OnStart method must return to the operating system once the service's operation has begun. It must not loop forever or block. To set up a simple polling mechanism, you can use the System.Timers.Timer component. In the OnStart method, you would set parameters on the component, and then you would set the Timer.Enabled property to true. The timer would then raise events in your code periodically, at which time your service could do its monitoring.To define what happens when the service is stopped, in the code editor, locate the
OnStop procedure that was automatically overridden when you created the project, and write code to determine what occurs when the service is stopped:protected override void OnStop()
{
eventLog1.WriteEntry("my service stoped");
}
You can also override the OnPause, OnContinue, and OnShutdown methods to define further processing for your component. For the method you want to handle, override the appropriate method and define what you want to occur. The following code shows what it looks like if you override the OnContinue method:protected override void OnContinue()
{
eventLog1.WriteEntry("my service is continuing in working");
}
Some custom actions need to occur when installing a Windows service, which can be done by the Installer class. Visual Studio can create these installers specifically for a Windows service and add them to your project. To create the installers for your service.- Return to design view for
Service1. - Click the background of the designer to select the service itself, rather than any of its contents.
- In the Properties window, click the Add Installer link in the gray area beneath the list of properties. By default, a component class containing two installers is added to your project. The component is named
ProjectInstaller, and the installers it contains are the installer for your service and the installer for the service's associated process. - Access design view for
ProjectInstaller, and clickServiceInstaller1. - In the Properties window, set the
ServiceNameproperty toMyNewService. - Set the
StartTypeproperty toAutomatic.
Tip
To avoid being asked about the system username and password you must change theAccount for the serviceProcessInstaller to LocalSystem. This is done by opening the ProjectInstaller design and then selecting the serviceProcessInstaller, press F4 and then change the Account property to LocalSystem. Or you can manually do that by creating a class that inherits from System.Configuration.Install.Installer like this:[RunInstaller(true)]
public class ProjectInstaller : System.Configuration.Install.Installer
private System.ServiceProcess.ServiceProcessInstaller
serviceProcessInstaller1;
private System.ServiceProcess.ServiceInstaller serviceInstaller1;
/// <summary>
/// Required designer variable.
/// </summary> private System.ComponentModel.Container components = null;
public ProjectInstaller()
// This call is required by the Designer.
InitializeComponent();
// TODO: Add any initialization after the InitComponent call
}
private void InitializeComponent()
{
this.serviceProcessInstaller1 =
new System.ServiceProcess.ServiceProcessInstaller();
this.serviceInstaller1 =
new System.ServiceProcess.ServiceInstaller();
// serviceProcessInstaller1
//
this.serviceProcessInstaller1.Account =
System.ServiceProcess.ServiceAccount.LocalSystem;
this.serviceProcessInstaller1.Password = null;
this.serviceProcessInstaller1.Username = null;
//
// serviceInstaller1
//
this.serviceInstaller1.ServiceName = "MyNewService";
this.serviceInstaller1.StartType =
System.ServiceProcess.ServiceStartMode.Automatic;
//
// ProjectInstaller
//
this.Installers.AddRange
(new System.Configuration.Install.Installer[]
{
this.serviceInstaller1,
this.serviceInstaller1});
}
}
To build your service project
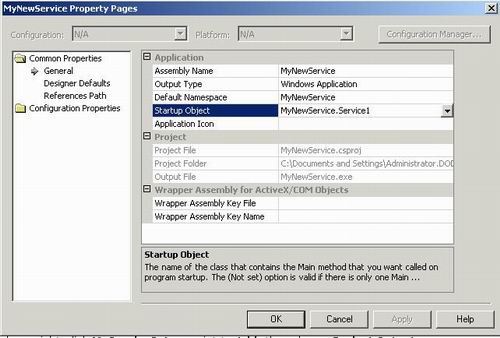
- In Solution Explorer, right-click your project and select Properties from the shortcut menu. The project's Property Pages dialog box appears.
- In the left pane, select the General tab in the Common Properties folder.
- From the
Startup objectlist, chooseMyNewService. Click OK. - Press Ctrl+Shift+B to build the project.
Now that the project is built, it can be deployed. A setup project will install the compiled project files and run the installers needed to run the Windows service. To create a complete setup project, you will need to add the project output, MyNewService.exe, to the setup project and then add a custom action to have MyNewService.exe installed.
To create a setup project for your service
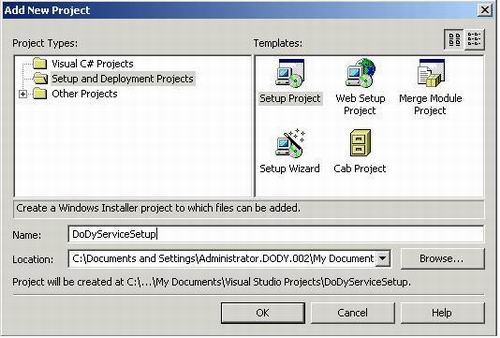
- On the File menu, point to Add Project, and then choose New Project.
- In the Project Types pane, select the Setup and Deployment Projects folder.
- In the Templates pane, select Setup Project. Name the project
MyServiceSetup.
To add MyNewService.exe to the setup project
- In Solution Explorer, right-click
MyServiceSetup, point to Add, then choose Project Output. The Add Project Output Group dialog box appears. MyNewServiceis selected in the Project box.- From the list box, select Primary Output, and click OK. A project item for the primary output of
MyNewServiceis added to the setup project. Now add a custom action to install the MyNewService.exe file.
To add a custom action to the setup project
- In Solution Explorer, right-click the setup project, point to View, then choose Custom Actions. The Custom Actions editor appears.
- In the Custom Actions editor, right-click the Custom Actions node and choose Add Custom Action. The Select Item in Project dialog box appears.
- Double-click the application folder in the list box to open it, select primary output from
MyNewService(Active), and click OK. The primary output is added to all four nodes of the custom actions — Install, Commit, Rollback, and Uninstall. - Build the setup project.
To install the Windows Service
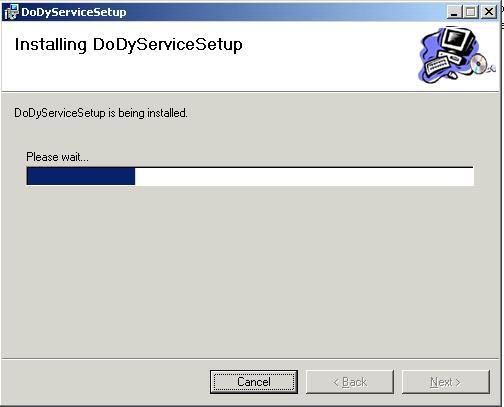
Browse to the directory where the setup project was saved, and run the .msi file to install MyNewService.exe.To start and stop your service
- Open the Services Control Manager by doing one of the following:
- In Windows 2000 Professional, right-click My Computer on the desktop, then click Manage. In the Computer Management console, expand the Services and Applications node. - Or -
- In Windows 2000 Server, click Start, point to Programs, click Administrative Tools, and then click Services. Note: In Windows NT version 4.0, you can open this dialog box from Control Panel.
- You should now see
MyNewServicelisted in the Services section of the window. - Select your service in the list, right-click it, and then click Start.
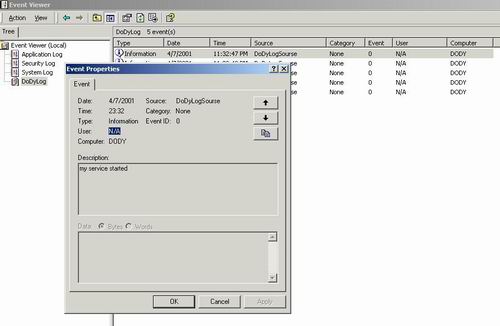
To verify the event log output of your service
- Open Server Explorer and access the Event Logs node. For more information, see Working with Event Logs in Server Explorer. Note: The Servers node of Server Explorer is not available in the Standard Edition of Visual Basic and Visual C# .NET.
To uninstall your service
- On the Start menu, open Control Panel and click Add/Remove Programs, and then locate your service and click Uninstall.
- You can also uninstall the program by right-clicking the program icon for the .msi file and selecting Uninstall.